1. Overview
Big Gallery WP Theme
Created: 08/08/2013By: Jan Skwara (johnnychaos)
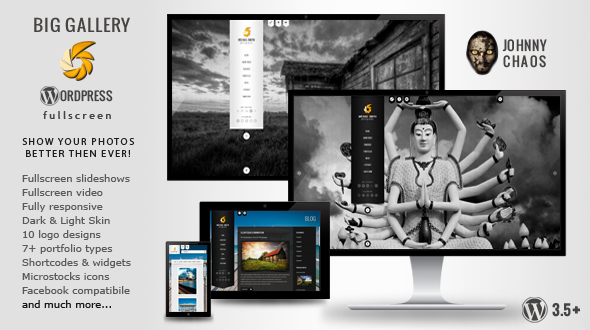
BIG Gallery is an unique way to present your photos, images or projects. With creative use of CSS3 and Javascript this theme will delight your visitors!
Features:
- Fill, uncut, full width or full height fullscreen slideshow (set it separately for every page)
- Autoplay slideshow
- Auto-hide navigation
- Fullscreen video background (you can use self hosted MP4 file, Youtube or Vimeo)
- 2 Skins: Dark and Light
- 10 logo designs, each with dark and light version (PSD)
- 8 portfolio types (fullscreen, slideshow, filterable and classic)
- Unique filterable modern blog
- Fancybox gallery
- Built in Wordpress video embeds and playlists supported
- Ajax contact form with real-time validation
- Twitter Integration
- Custom widgets
- Shortcodes
- 29 social icons
- 21 stock sites icons to sell your photos better
- Cross-browser compatibility (IE8/9, Firefox, Opera, Safari, Chrome)
- Valid HTML & CSS
- Audio support (global, and separately for every page)
- All photos included
- 600+ Google Fonts
- Translation ready (and already contains language files for English, Russian and Polish lang)
- Responsive design - mobile and tablet ready
2. Installation
To run this theme you must have a WordPress platform already installed on your server. You can download latest version of WordPress on it's official website. For information in regard to installing the WordPress platform, please see the WordPress Codex - http://codex.wordpress.org/Installing_WordPress
2.1 Installing theme
Extract the zipped package downloaded from ThemeForest, in the extracted package you will find big_gallery_wp folder which is the WordPress theme.
You can install the theme using WP admin panel or FTP software:
-
WordPress:Zip
big_gallery_wpfolder tobig_gallery_wp.zipfile. Navigate toAppearance -> Install Themes -> Uploadpage. Selectbig_gallery_wp.zipfile. Press theInstall Nowbutton to upload and install the theme. -
FTP: Upload theme folder (
big_gallery_wp) to/wp-content/themes/folder on your server.
After uploading the theme, you have to activate it. Navigate to Appearance -> Themes page to activate the theme.
2.2 Setting up the Homepage and Blog
By default the homepage will show up your latest blog posts. If you want to show up a fullscreen slider or video (like in the demo) or other static page, you must create two new
pages (Pages -> Add New) - one for homepage, second for blog page. For example you can create one page called „Home” and one called „Blog” (Note: you can choose other names, it's just an example). Pages can be empty for now.
Then go to Settings -> Reading, check A static page and choose correct pages in select boxes as in screenshot:
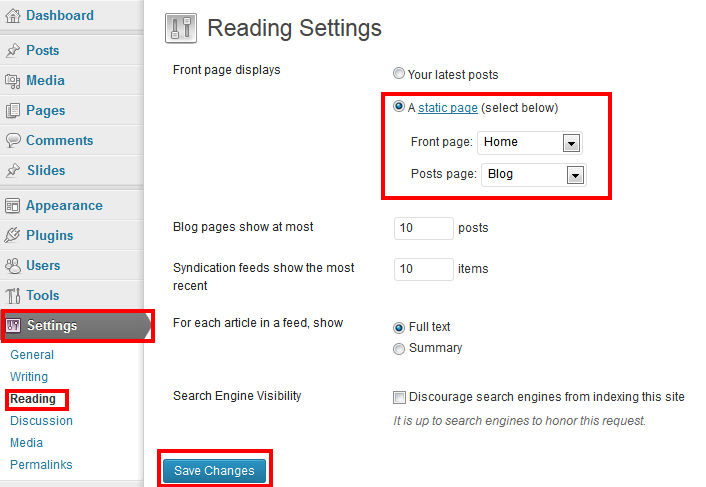
Now first page ("Home" in our example) will be front page. You can create fullscreen slider, fullscreen video or other page here. Second page ("Blog" in our example) will be reserved for showing blog posts. Leave content of this page empty, but you can set Page options.
2.3 Demo content
You can find demo content from live preview in downloaded package (folder demo_content). You can import it to your wordpress and use as a starting point for your customization. To add demo content go in your Wordpress admin panel to Tools -> Import -> Wordpress. Install importer popup will appear. Install plugin and import biggallerywp.xml file from demo_content. You need also to copy content of demo_content/uploads to wp-content/uploads in your Wordpress instalation.
3. Theme options
After activating the theme please take some time to fill theme options. You will find them after navigating to Appearance -> Theme Options
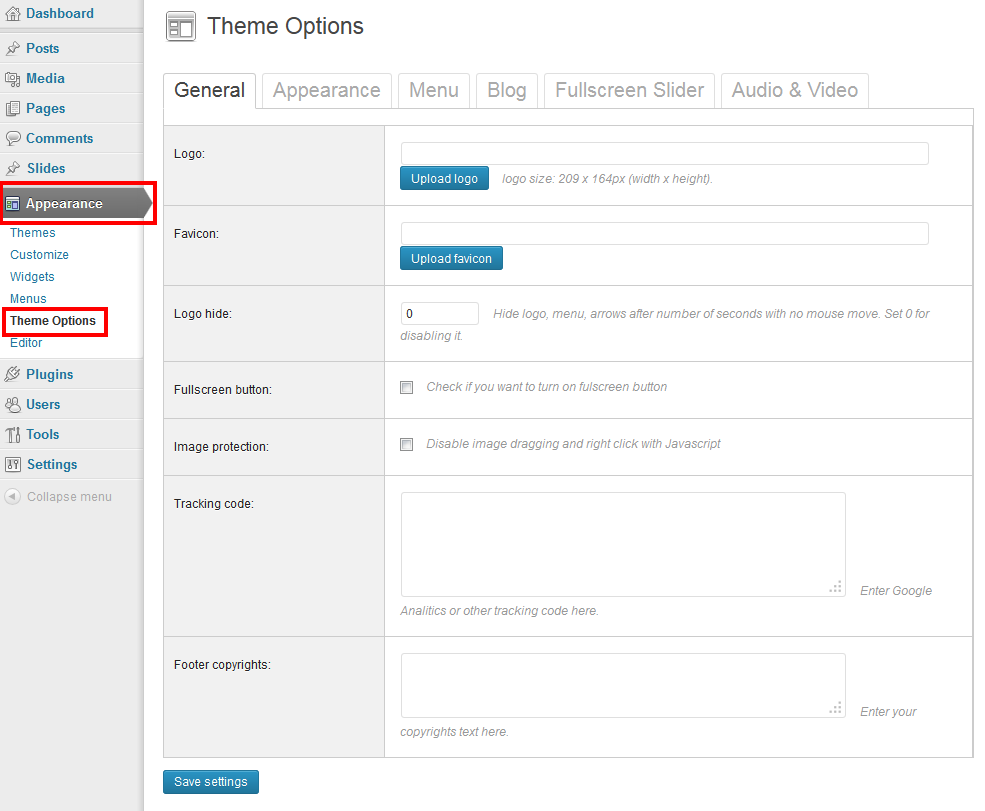
Most of options are self-explanatory, but some of them are explained below:
General -> Logo hide- BIG Gallery has another unique feature. Logo, menu and other elements are autohiding after few seconds if you don't move the mouse (works in sliders and fullscreen video pages). So now you can see only photos! If you move the mouse, navigation will show up. Open the live preview and wait for 2 seconds (do not move the mouse). Set 0 for disabling this feature.General -> Tracking code- Enter full Google Analitics or other tracking code here. For Google Analitics it will look like this:<script type="text/javascript"> var _gaq = _gaq || []; _gaq.push(['_setAccount', 'UA-XXXXX-Y']); _gaq.push(['_trackPageview']); (function() { var ga = document.createElement('script'); ga.type = 'text/javascript'; ga.async = true; ga.src = ('https:' == document.location.protocol ? 'https://ssl' : 'http://www') + '.google-analytics.com/ga.js'; var s = document.getElementsByTagName('script')[0]; s.parentNode.insertBefore(ga, s); })(); </script>-
General -> Custom javascript code- You can add some custom javascript here (without <script> tag). This code will be added to page header, before jQuery and other scripts. Appearance -> Custom css- You can add here custom CSS code (without style tag). Eg.:.sometag {color:red;}. Note: If you like to overwrite some existing rule, you need to add !important keyword. Eg.:body {color: red !important;}. I recomment to use Firefox with Firebug extension to easily find what styles need to be overwitten.Appearance -> Fonts- You can specify fonts for headers (default is Oswald) and regular text (default is Arial). You can choose from more than 600 standard and Google fonts.Appearance -> Secondary (hover) color- You can define secondary color here. This is a color of your hovered links. Note: for best look you should also edit graphic files. You will find source psd files ifpsdfolderAudio & Video -> Default audio file- Paste url to mp3 file, eg.:http://www.somedomain.com/somefile.mp3(Note: file must be on-line, don't put paths to files from your local computer)
In addition to the global options you can set some options in every page and post.
Appearance -> Default background color
4. Menus and Widgets
4.1 Custom menu
This theme menu is controlled through the Wordpress Custom Menus system. Big Gallery has one menu location, located in left column, under the logo.
Please, read more about custom menus here - http://en.support.wordpress.com/menus/
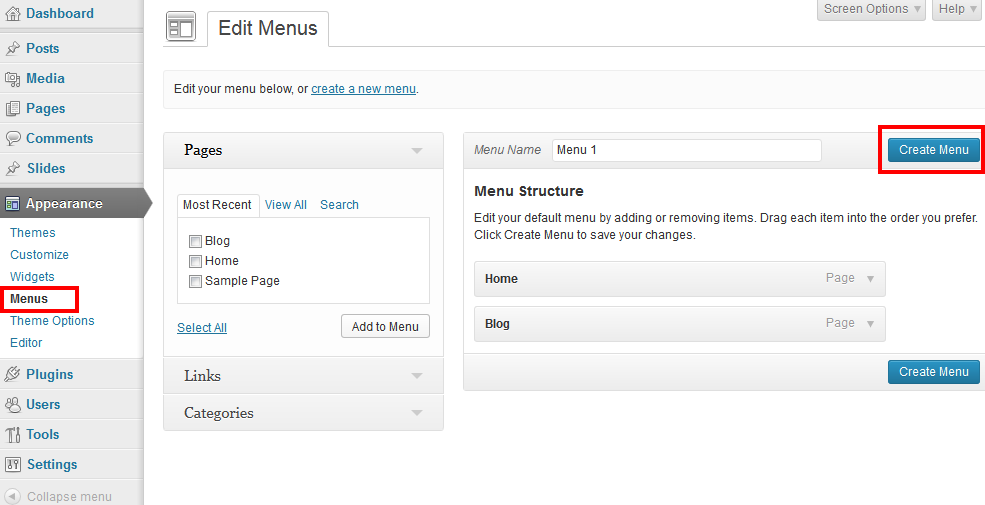
To add a menu go to: Appearance -> Menus. Add elements to menu and click Create Menu:
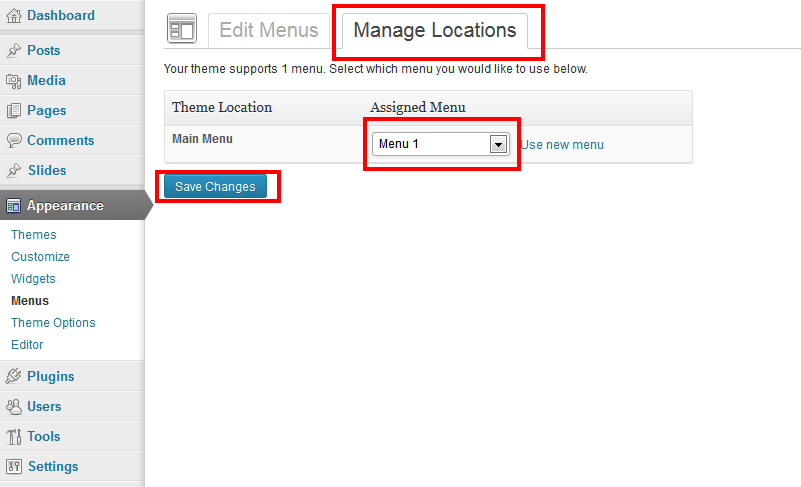
After creating a menu click tab: Manage Locations and choose created menu from the select box:
Appearance -> Theme options -> Menu will be displayed at the bottom of this menu.
4.2 Widgets
Big Gallery has one sidebar area on blog posts and archives (except Modern Blog option). Location of sidebar can be chose in Appearance -> Theme options -> Blog. Read more about adding widgets to the sidebar: http://en.support.wordpress.com/widgets/
Theme comes with two custom widgets:
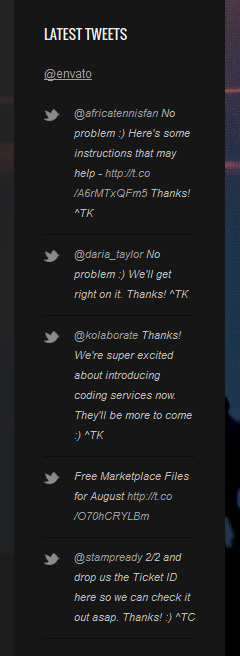
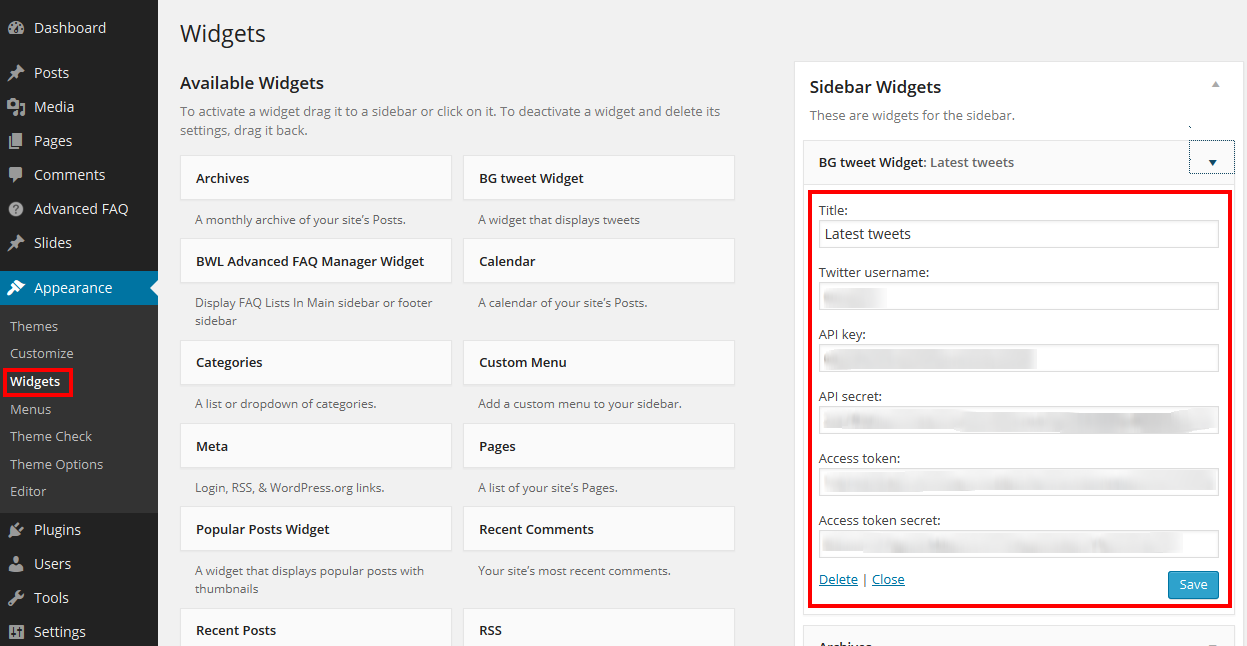
- BG tweet Widget - allows to present tweets:
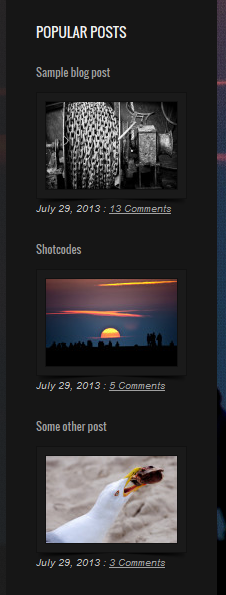
- Popular Posts Widget - A widget that displays popular posts with thumbnails (post
Featured Imagemust be defined for thumbnail):
New Twitter API 1.1 requires oAuth Token Key, here is how to configure plugin:
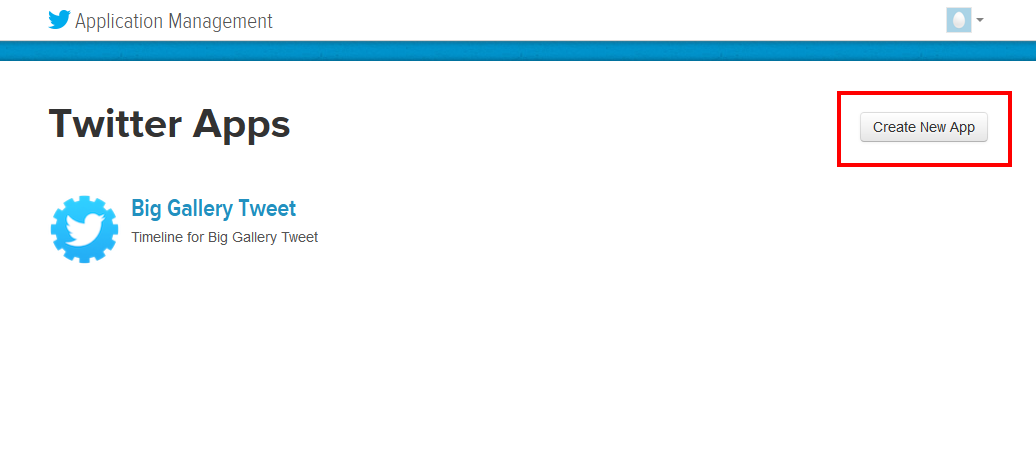
Go to https://apps.twitter.com and login oir register.
Choose "Create New Spp" like in screenshot below:
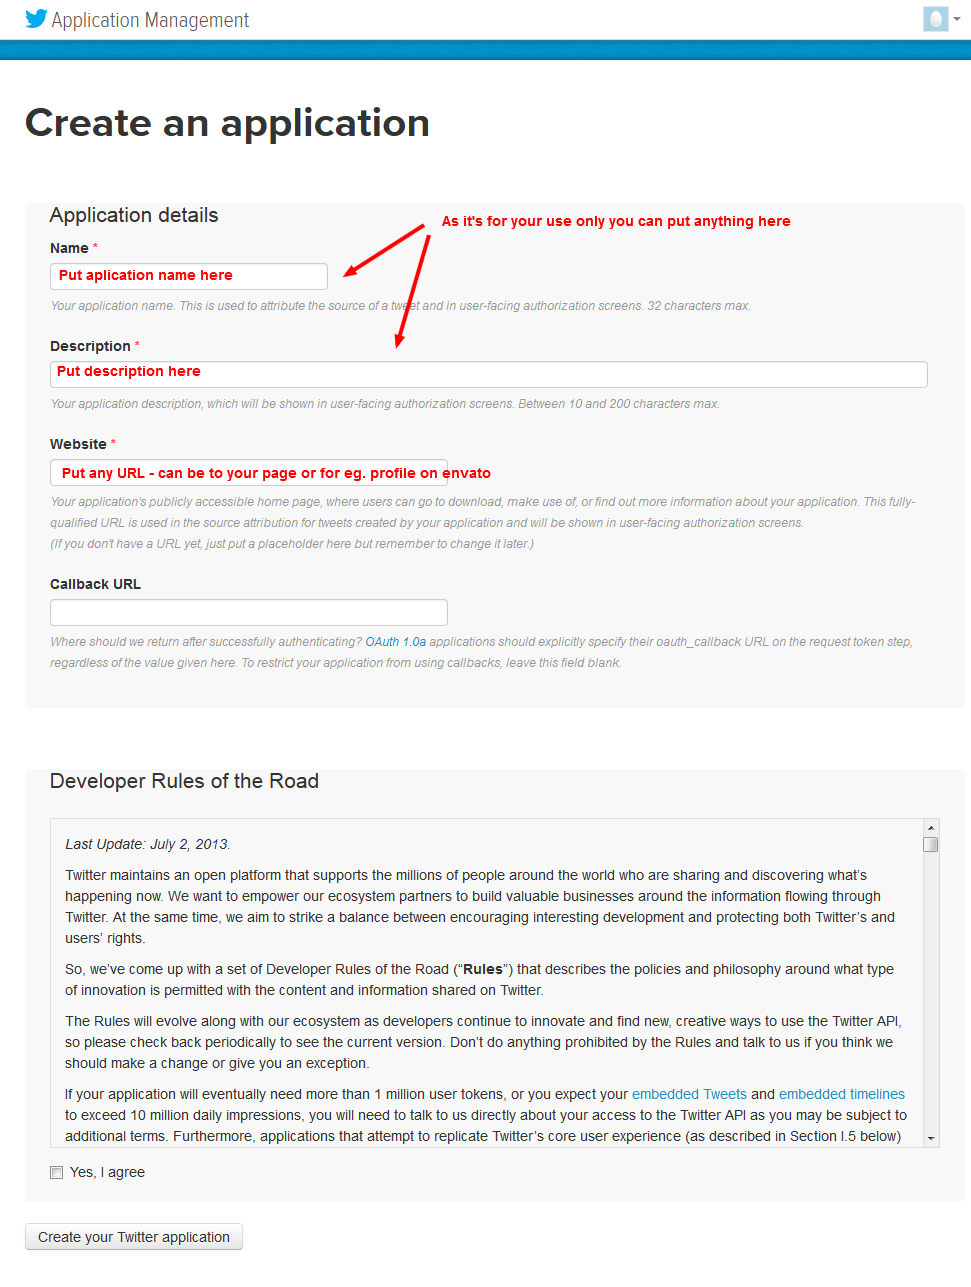
Fill aplication name, description and URL. As this application will be only for your use, you can put anything there.
When aplication will be created go to "API Keys" tab.
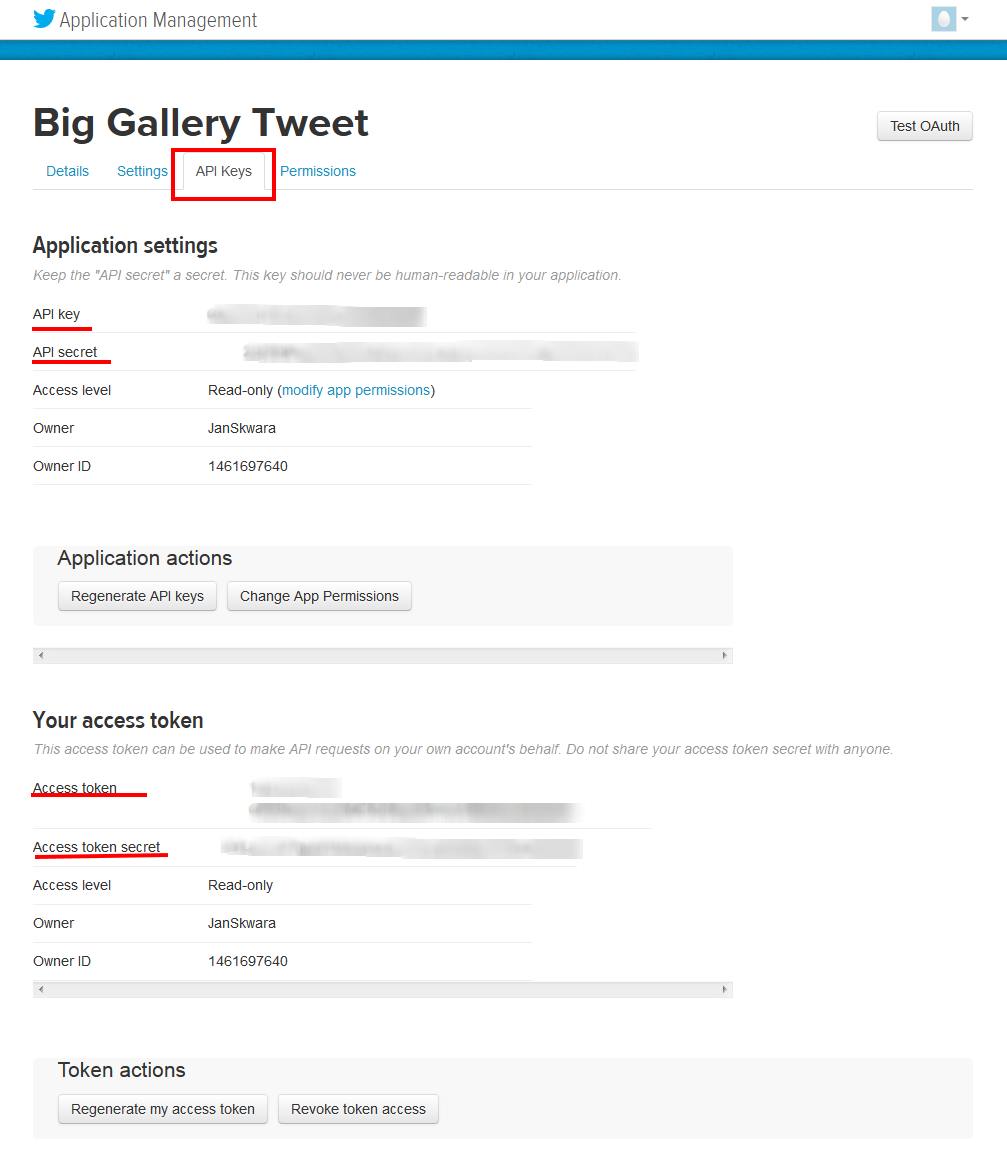
Copy API key, API secret, Access token, Access token secret and paste it into Wordpress Tweet Widget:
5. Creating Sliders
You can find few fullscreen templates, but if you’re a photographer, you know how important is composition. Fullscreen photos are always cutted or stretched, so they don’t look as you wanted.
BIG Gallery allows you to choose from 4 ways of fullscreen slideshow. You can fill all screen with the image, fill full width or height. You can also automatically adjust images to prevent them from being cut. You can change slideshow type separately for every page.
Check it by yourself (you can play with the browser size – slideshows are fully responsive):
- Filled – all screen is filled with image
- Uncut – all image is visible
- Full width – all images are resized to have browser width
- Full height – all images are resized to have browser height
All slides should be created as "Slides" custom post type.
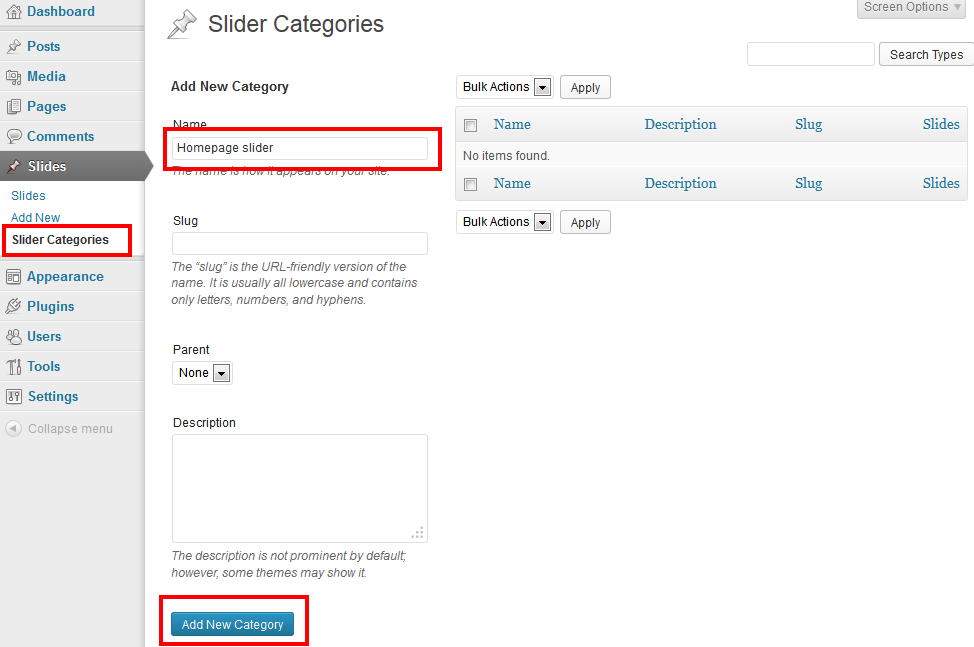
First create one category for every slideshow. For example you can create category called "homepage slider": navigate to Slides -> Slider categories -> Add New Category and fill new category name:
Then add „Slider” items. Choose correct category from categories for each item. You can define title, content and order. Add photo under
Set featured image.
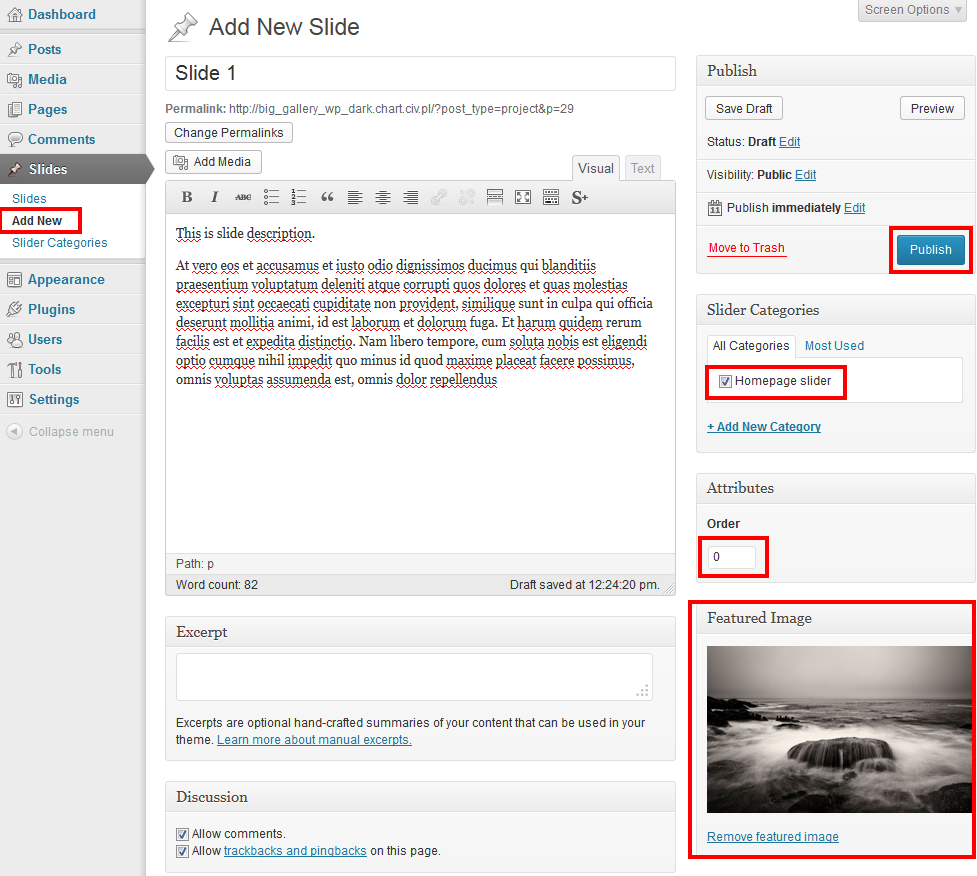
Slides can be vieved by choosing Slides -> Slides. You can edit slides order choosing quick edit option.
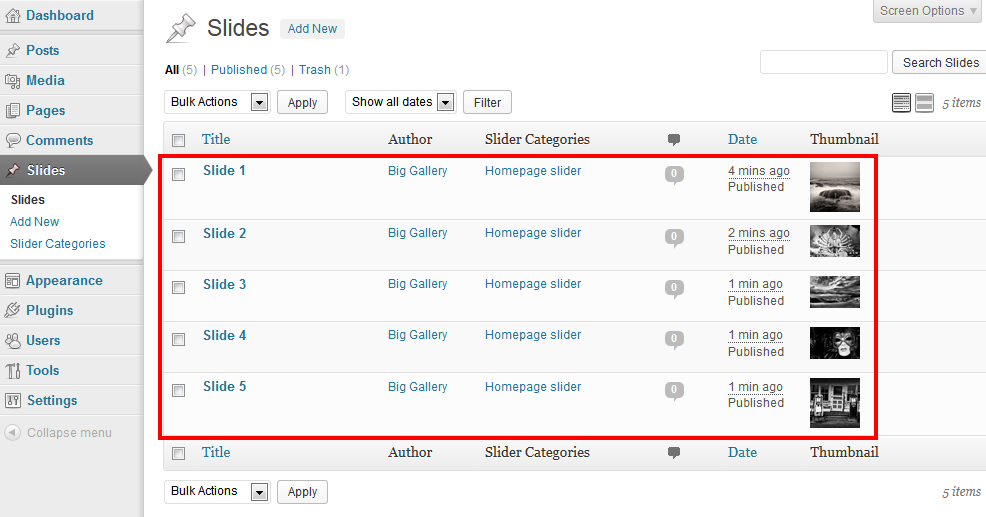
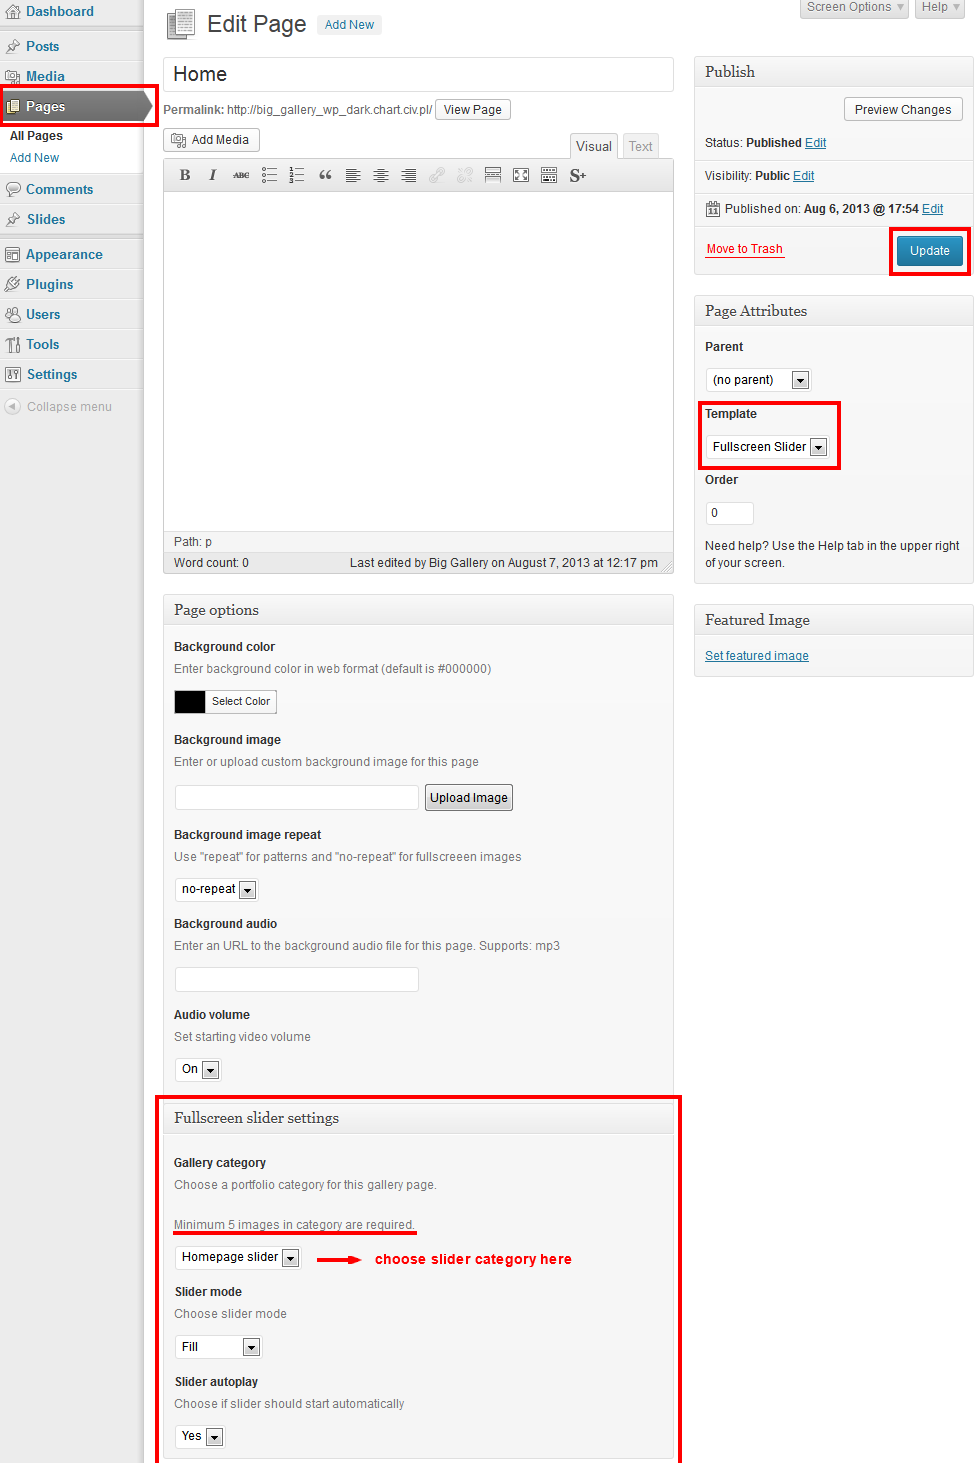
After adding few items (min. 5 items are required for slider) edit or create page, that will be slideshow container. In our example it can be page named „Home”.
Set Fullscreen Slider in Template option. Some options (Fullscreen slider settings) will begin visible under content section.
Choose correct gallery in Gallery settings.
You can also add link to audio file, background color and others.
6. Creating Galleries
Big Gallery allows you to create filterable multicolumn or slideshow galleries using Wordpress built-in gallery feature with added extra functionality.
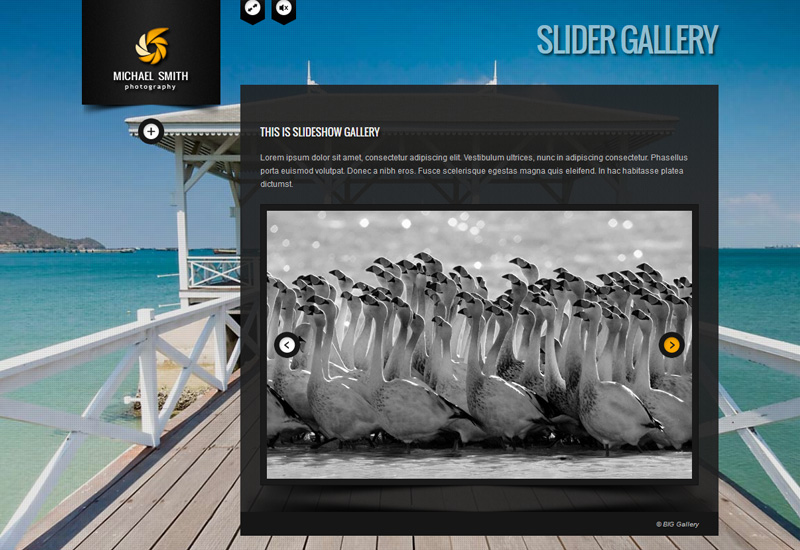
You can also easily create slideshow gallery.
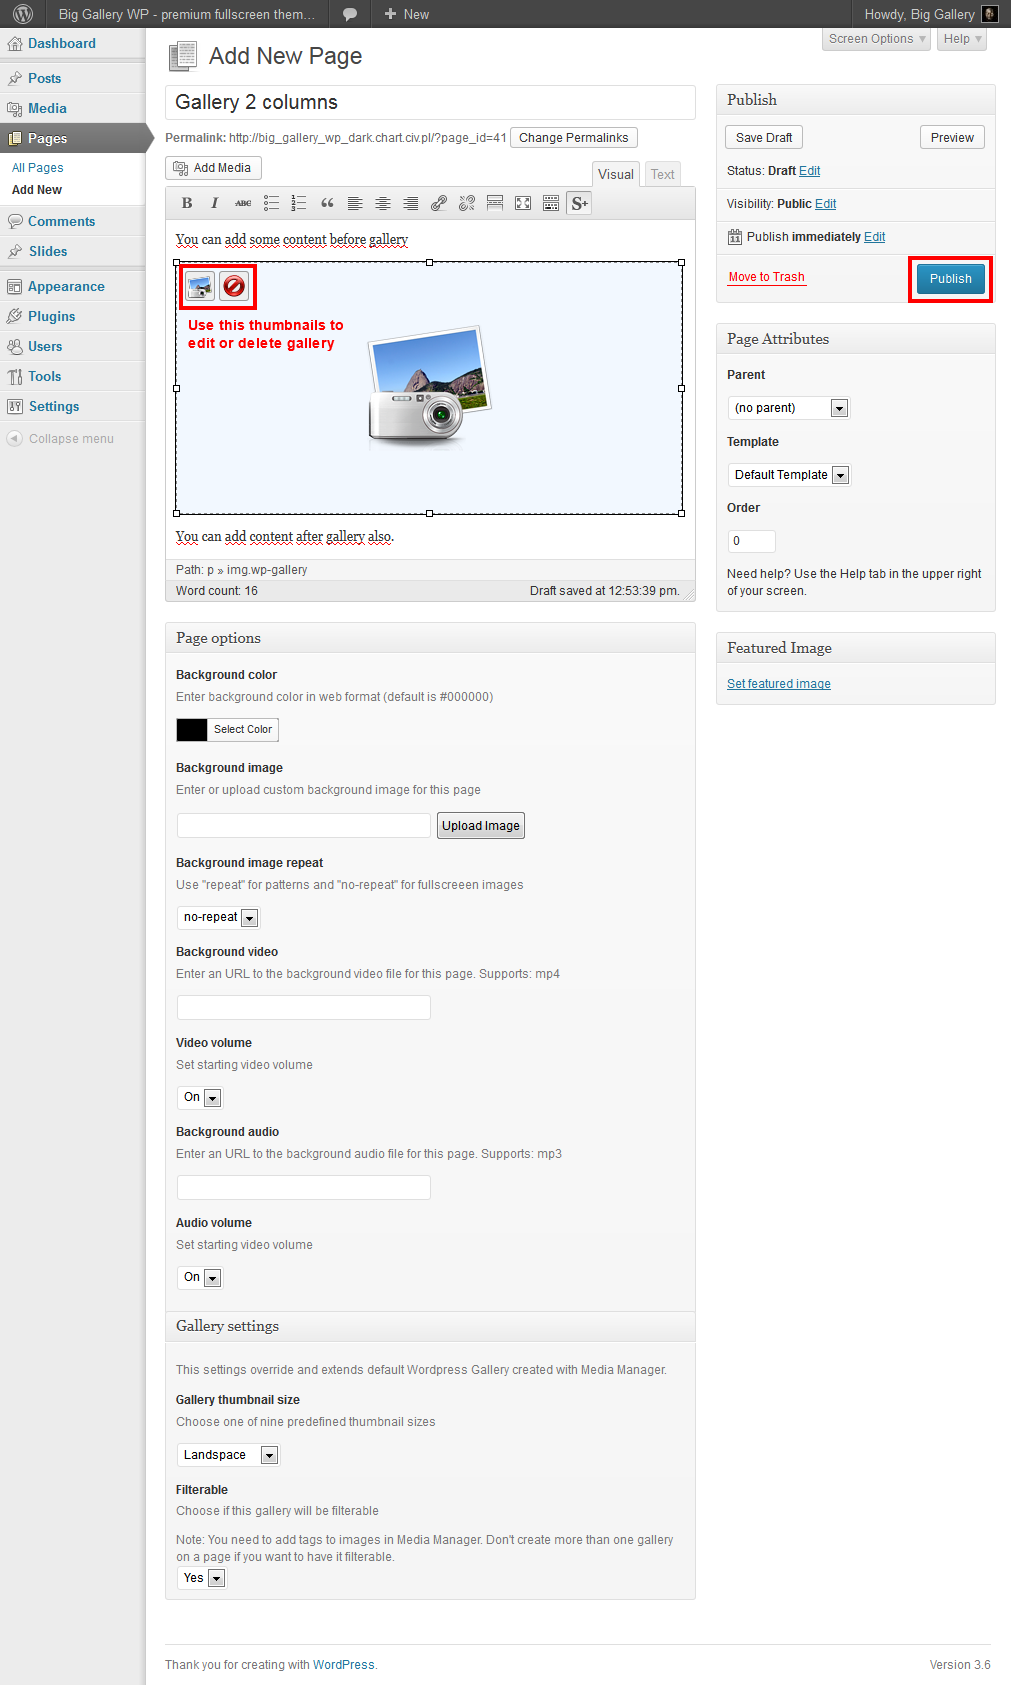
To add gallery:
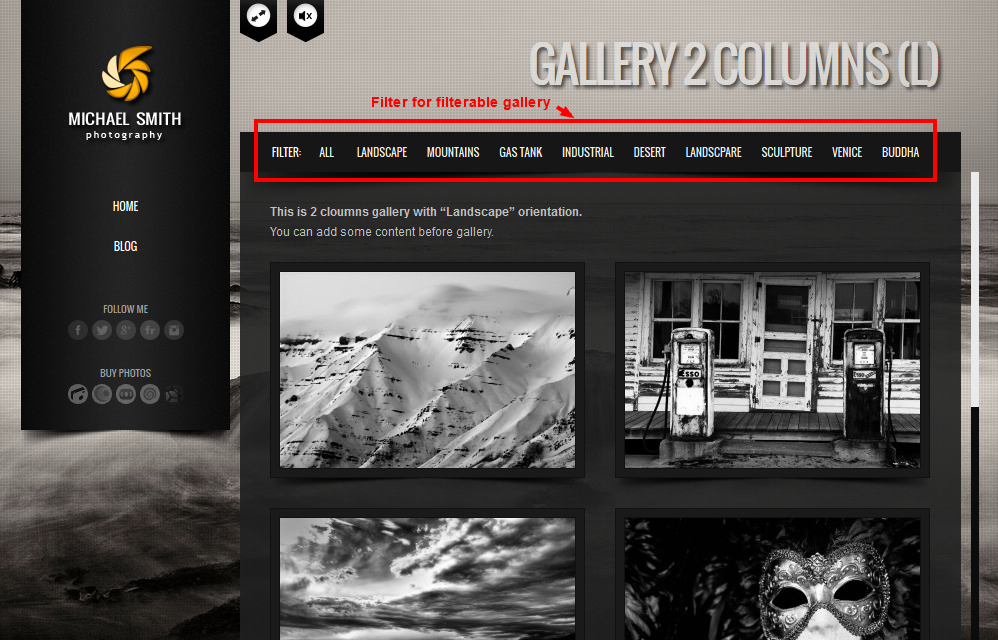
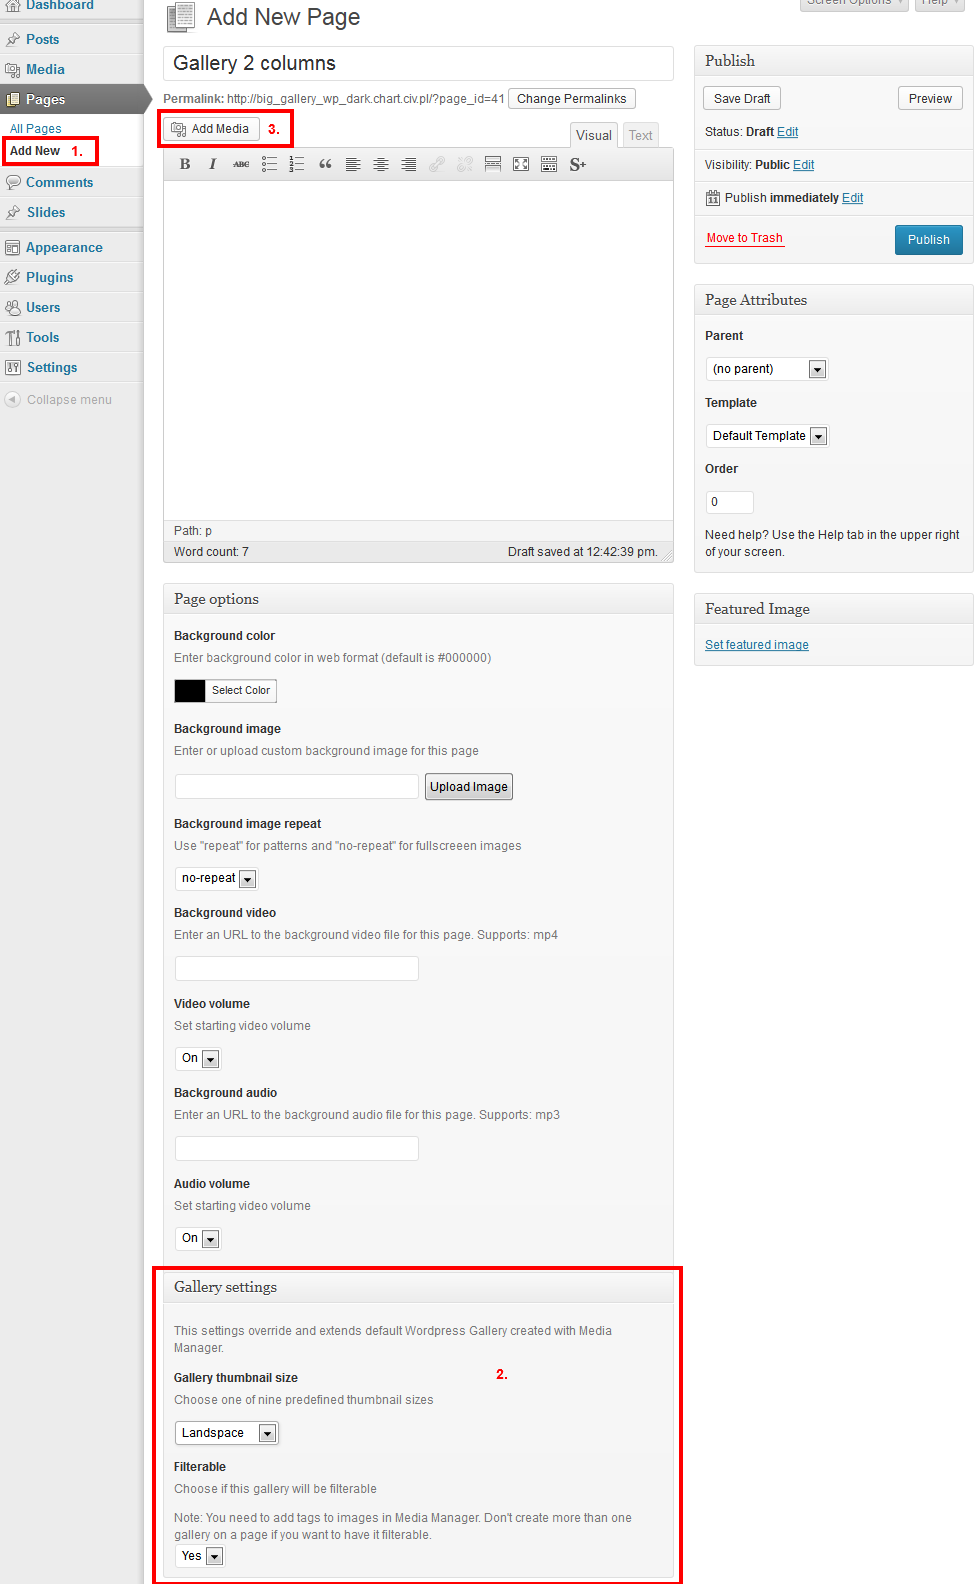
Add or edit post or page, choose number of columns and thumbnail size from Page options -> Gallery settings -> Gallery thumbnail size. You can choose 2,3 or 4 columns and slideshow layout. For each collumn gallery you can choose "landscape", "square" or "portrait" thumbnail size.
Live examples:
- 2 columns
- 3 columns
- 4 columns
- Slideshow
You can also decide if gallery will be filterable (not available with "Slideshow" gallery).
After choosing gallery layout press Add media button above content editor:
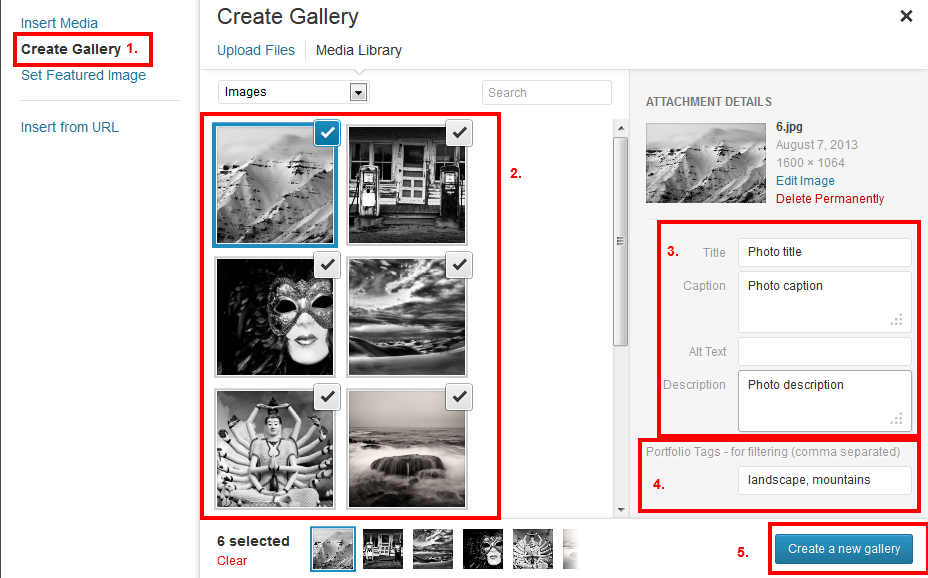
Choose Create gallery (1) from left menu and select or upload files (2). You can add title, caption and description to every image (3).
If you want to have filterable gallery, you need to add comma separated "Tags" to every image (4). Press Create a new gallery button (5).
In next screen you can set gallery order and decide if thumbnails will be linking to default "Attachment Page" or "Popup Fancybox Gallery" (not available with "Slideshow" gallery). For the first option set Gallery Settings -> Link to to Attachment Page, for fancybox gallery choose Media File.
Here you can test both galleries:

After inserting gallery you can add additional content before and after gallery. You can even insert second gallery on the same page, but "filterable" option will only work for first gallery.
7. Creating Video Pages
7.1 Fullscreen Video Page
Big Gallery allows you to create stunning fullscreen video page - try the live preview. You can use MP4, Youtube or Vimeo file.
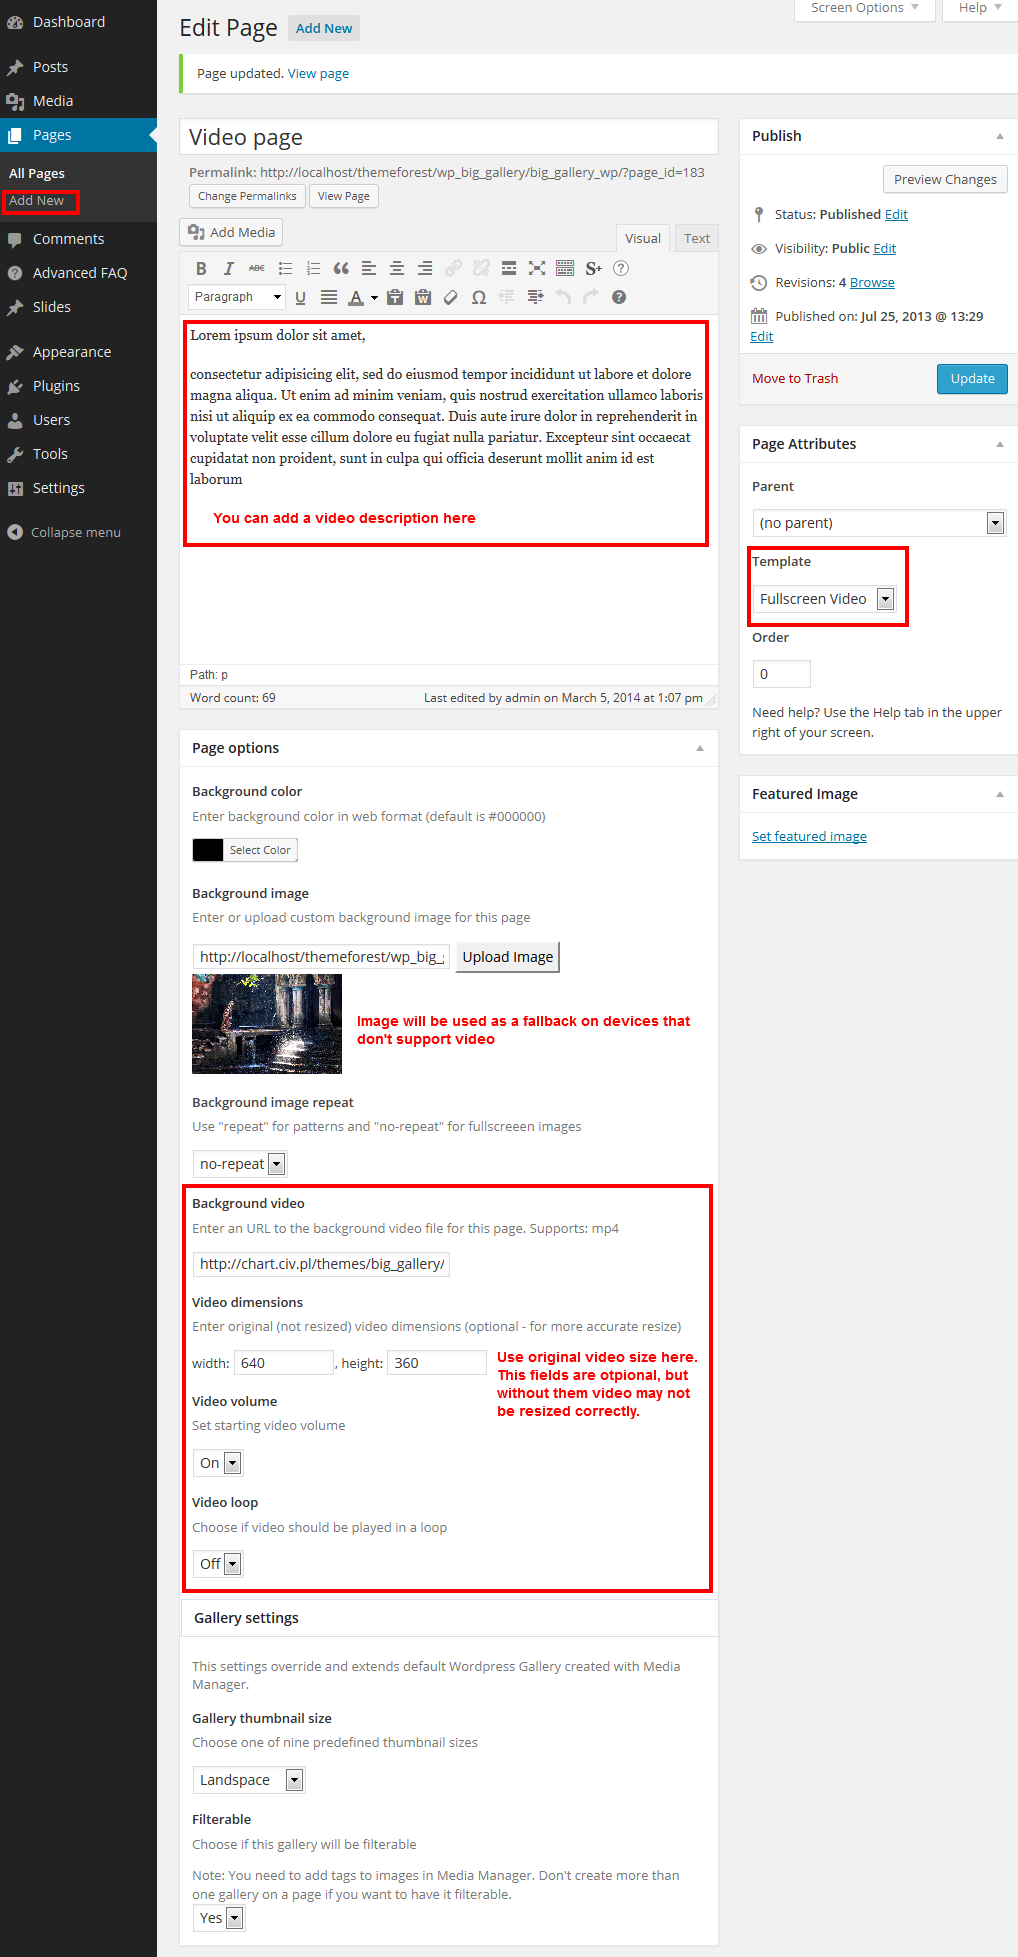
To add video page:
- Choose
Pages -> Add Newand create new page. - Choose Fullscreen video under the
Page attributes -> Template - Paste video url in
Page options -> Background video. You can use MP4, Youtube or Vimeo file. Url should look like this:
a) For MP4 file:http://www.somedomain.com/video.mp4(Note: file must be on-line, don't put paths to files from your local computer
b) For Youtube:https://www.youtube.com/watch?v=wb1uBBaO8zIorhttp://youtu.be/wb1uBBaO8zI
c) For Vimeo:http://vimeo.com/106990857 - For MP4 file add video original dimensions in
Page options -> Video dimensions. For Youtube and Vimeo file dimensions are taken automatically - Choose the starting video volume in
Page options -> Video volume - You can also choose is video will be displaying in the loop or only once
- You can add page content. It will be used as video description
- Add background image - it will be used as a fallback on devices that doesn't support background videos (like iPhone)
- "Publish" the page.
7.2 Classic Page With Video Background
You can add video background to any page and post - try the live preview.
To add video background create post or page and add mp4 video url in Page options -> Background video, eg.: http://www.somedomain.com/video.mp4 (Note: file must be on-line, don't put paths to files from your local computer).
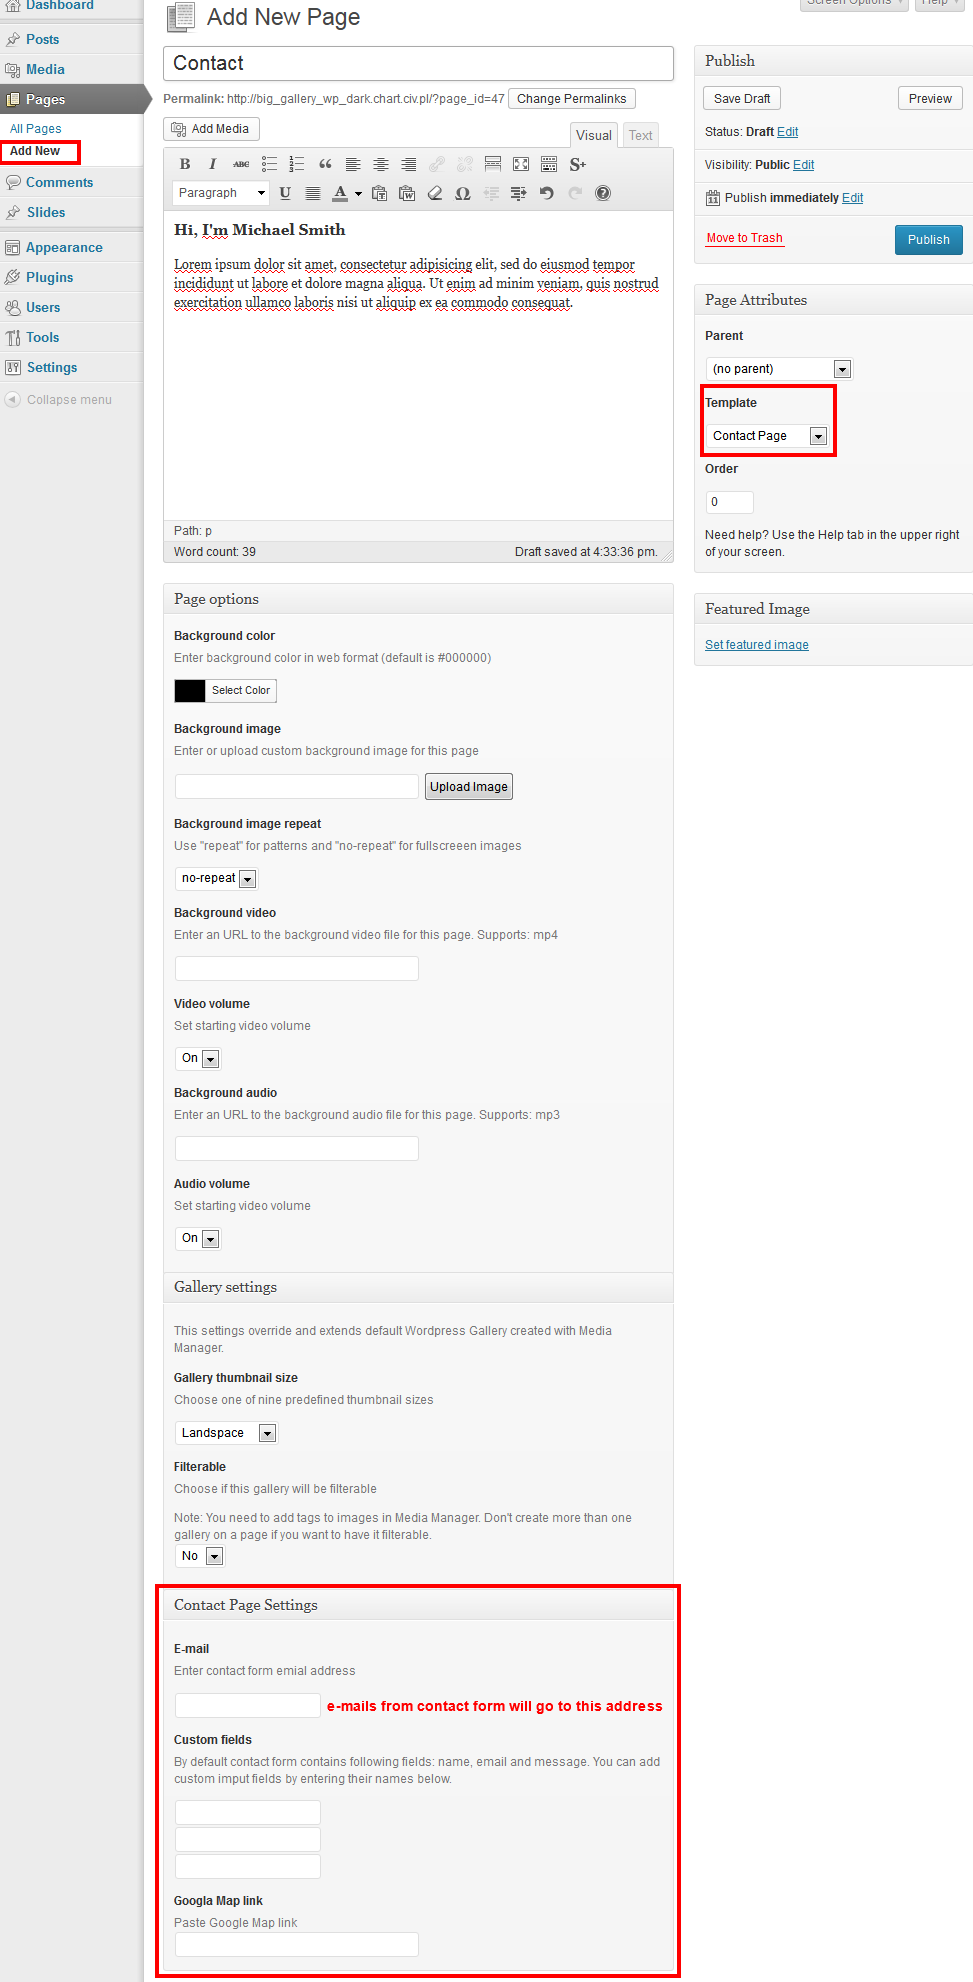
8. Creating Contact Page
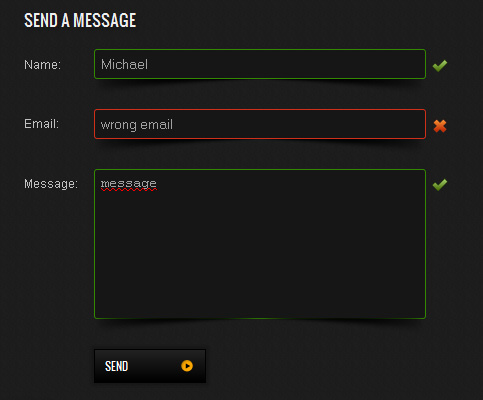
Theme comes with the working Ajax Contact Form with real-time validation.
To add contact form create new page (Pages -> Add New) and choose Contact Page in Page Attributes -> Template dropdown. New options will appear at the bottom of Page Options. You need to add e-mail address (e-mails from contact form will go there). You can also add up to three custom form fields and Google Map:
8.1 Adding Google Map
Adding map with new embed code:
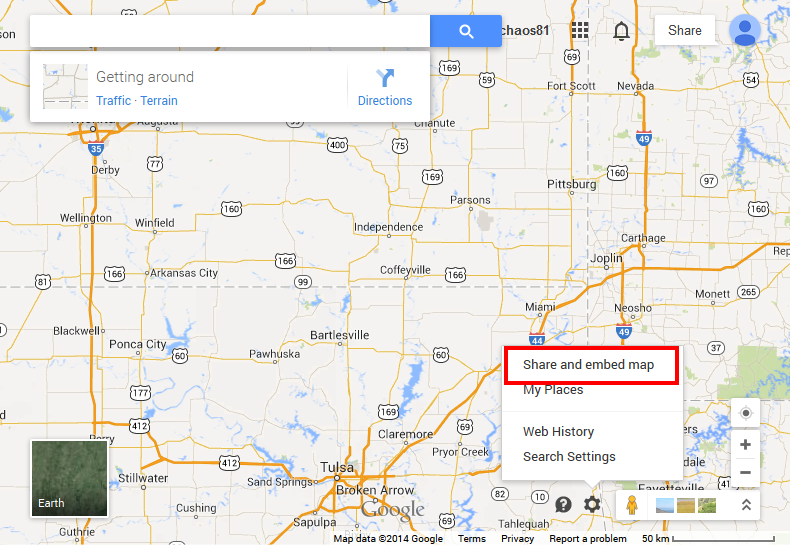
Click on "gear wheel" icon on the right bottom of thwe page and choose "share and embed map":
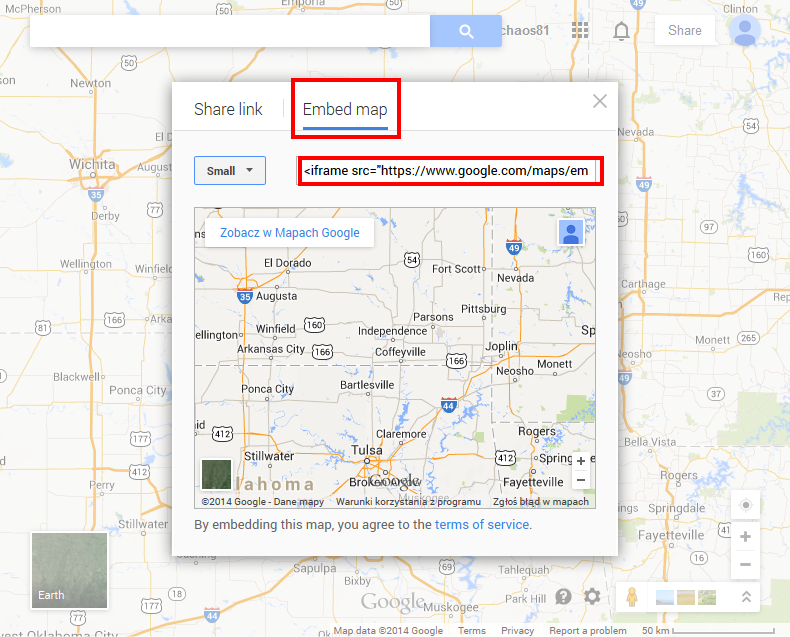
Choose "Embed map" and copy all emened code (with <iframe> tag etc.):
Adding map with old embed code:
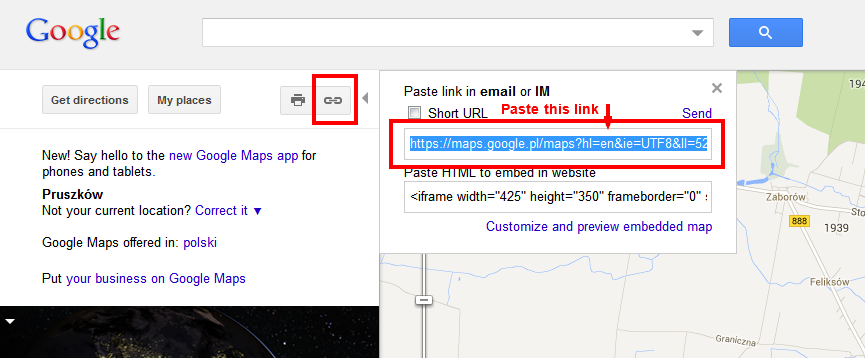
Copy Google Map link from http://maps.google.com: like on this screenshot:
9. Blog
You can choose one oh three blog layouts in Appearance -> Theme Options -> Blog -> Choose blog style:
- Modern Filterable Blog
- Classic with right sidebar
- Classic with left sidebar
- and Classic without sidebar.
In Modern Blog categories will be used to create filter. Please don't add to many categories and use short names if you won't to use this layout (In other case some categories won't be visible in "filter"). You should also add "featured image" to every post. Those images will be used as post thumbnails.
10. Shortcodes
Big Gallery comes with many custom shortcodes. Read more about shortcodes here: http://en.support.wordpress.com/shortcodes/.
You can see all shortcodes "in action" in Live Preview.
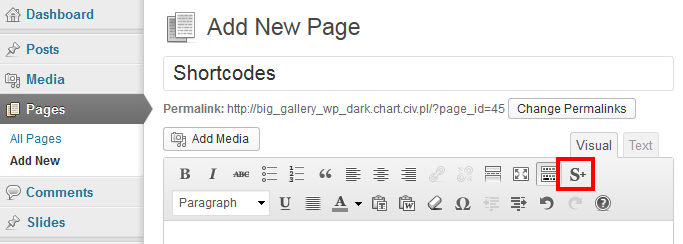
To add custom shortcode press S+ icon from content editor:
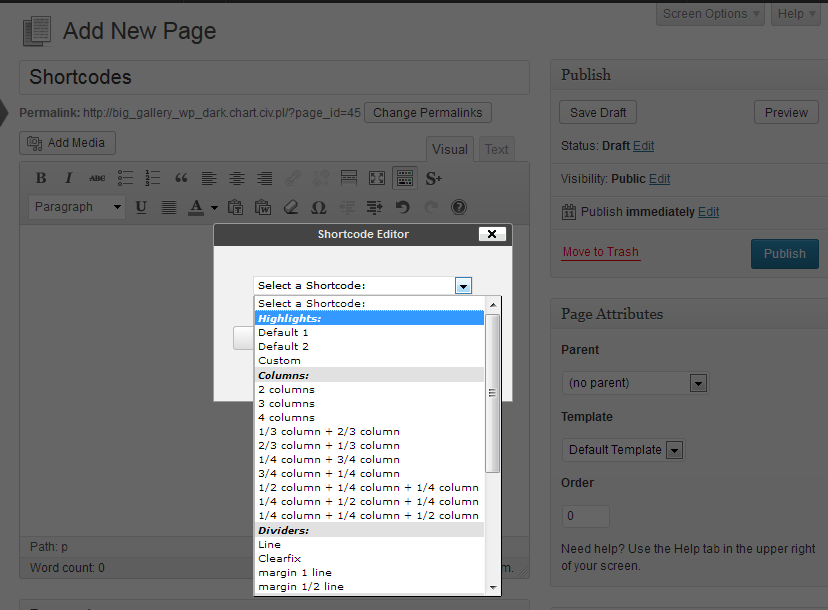
Choose shortcode from dropdown:
Most of shortcodes are self-explanatory, but some of them are explained below:
- custom highlight and custom button -
colorandbackgroundshould be valid web colors. You can use English name (eg. red) or hexadecimal value (eg. #121212). See web safe colors. - Fancybox image - Allows you to add image with loupe icon and fancybox popup. You need to specify full path to thumbnail and large photo, eg.:
[fancybox float="center" title="photo title" thumbnail="http://yourdomain.com/wp-content/uploads/2013/08/16-150x150.jpg" large="http://yourdomain.com/wp-content/uploads/2013/08/16.jpg"].
It's a bit tricky to get links to thumbnails of uploaded photos, but you can do it this way: insert image with chosenAttachment Display Settings -> SizeandAttachment Display Settings -> Link Toset to "Media File" somewhere in the content. Click "Edit" icon in upper left corner of the image. In popup window you will find full image url (Edit Image -> Link URLand thumbnail urlAdvanced Settings -> Source). Copy this values and paste in shortcode. Now you can delete image. - Image with link and loupe icon - Works similar to "Fancybox image" but can link to any URL. Get thumbnail source with the same method as above.
- Qtip description - allows to add "onhover" description to text or other element:
11. Social Media
Big Gallery allows your visitors to connect with you and share your photos with social media.
You can add social media links to your profiles in menu. You have over 20 social media sites to choose from. To add them go to Appearance -> Theme Options -> Menu ad insert links (full url) to your social profiles.
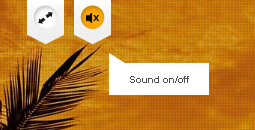
You can also allow users to share your photos via social sites (publish on their walls, pin on boards, tweet about it). To turn this feature on go to Appearance -> Theme Options -> General. You can choose witch social sites you want to support. You can also decide which photos you want to add sharing option:
a) You can choose Fullscreen Slider photos (links will be in photo description), see below:
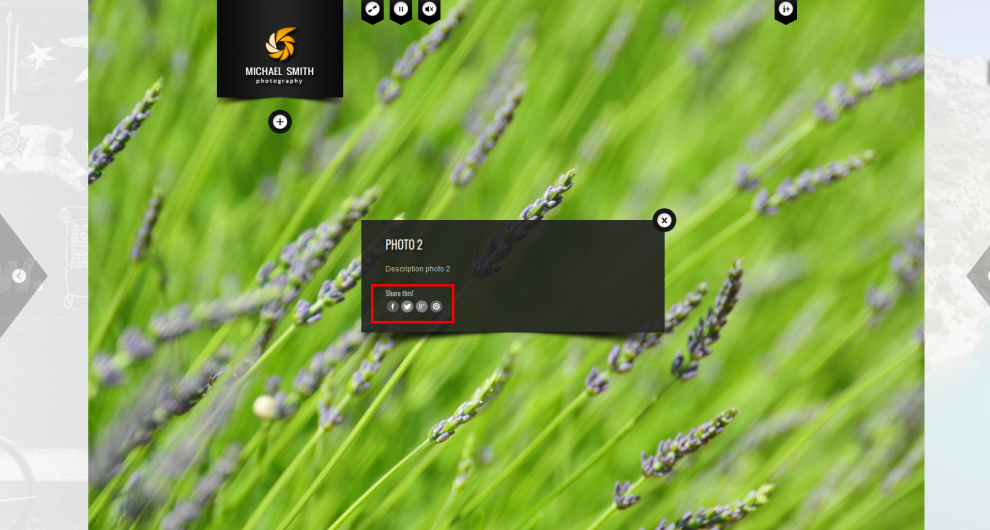
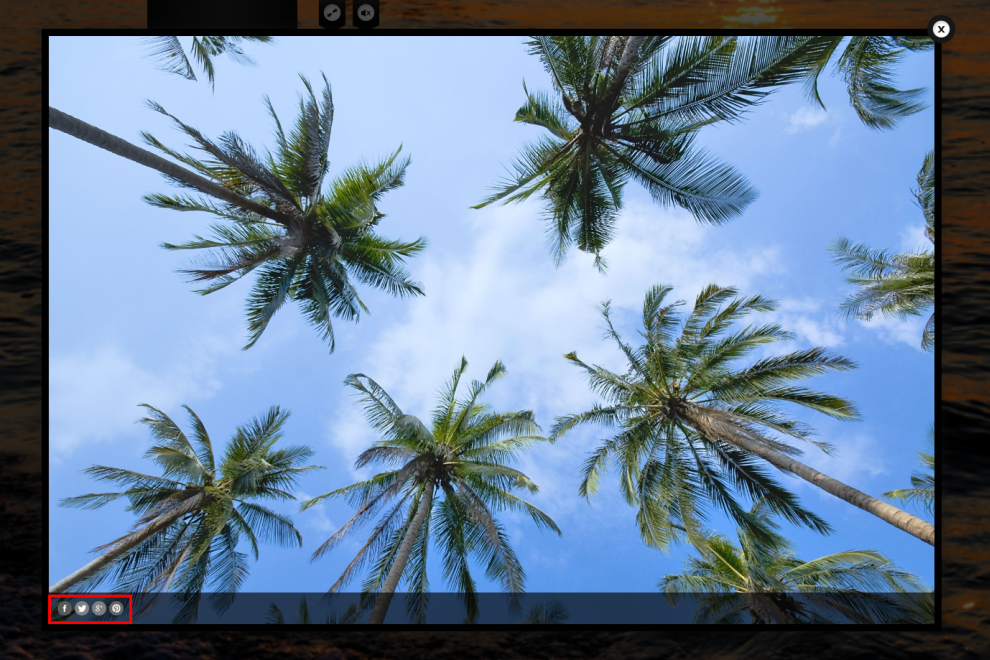
b) You can choose Gallery & Fancybox popup photos (icons will be added to all photos that are showing in a fancybox popup window - this means gallery photos, blog post thumbnails, and photos added with "Fancybox" shortcode), see below:
12. Facebook Integration
Big Gallery is compatible with facebook frame size, which mean that you can use is a facebook custom tab. Read the documentation about facebook integration.
13. PSD Files
Photoshop files are in download/psd. You can find there 10 logo designs and files that help you edit graphic elements of the website.
14. Resources
Here are links to the resources I've used:
- Superfish menu
- CoruFredSel
- Filterable
- SimpleModal
- Fancybox
- qTip
- Timer Plugin
- Tweetie
- jScrollPane
- video.js - Video player
- jPlayer
- TinyNav
- debouncedresize
- Lazy Load
- Responsive Slides
- jQuery resize plugin
- Social media icons
- Russian translation by Nikyboom
- Photos:
- Videos:
- Music:
 Act Cool ( Roman Holiday ) by Loveshadow is licensed under a Attribution.
15. Customization
I'm offering installation and customization of this theme based on my hourly rate – 30$/hour. Send me an e-mail if you are interested.
16. What's next?
Once again thank you for purchasing my template. Enjoy!
If you have any questions that are beyond the scope of this help file, please feel free to submit a Support Ticket here.
You can also take a look at my other themes and templates.
Follow me on Themeforest to be notified about my new products.
PS: I would like to thank my beta testers, Ronen Frieman and Geoff McGrath for their time and helpful comments.